Tag: DIY

DIY Reverse Osmosis Filter for Maple Sap

Notes from the reverse osmosis system build we are planning:

Ideally, we run RO inside — lose 3% efficiency on RO for every degree drop, and systems are rated at 77 F. Is this bad for sap storage, though?

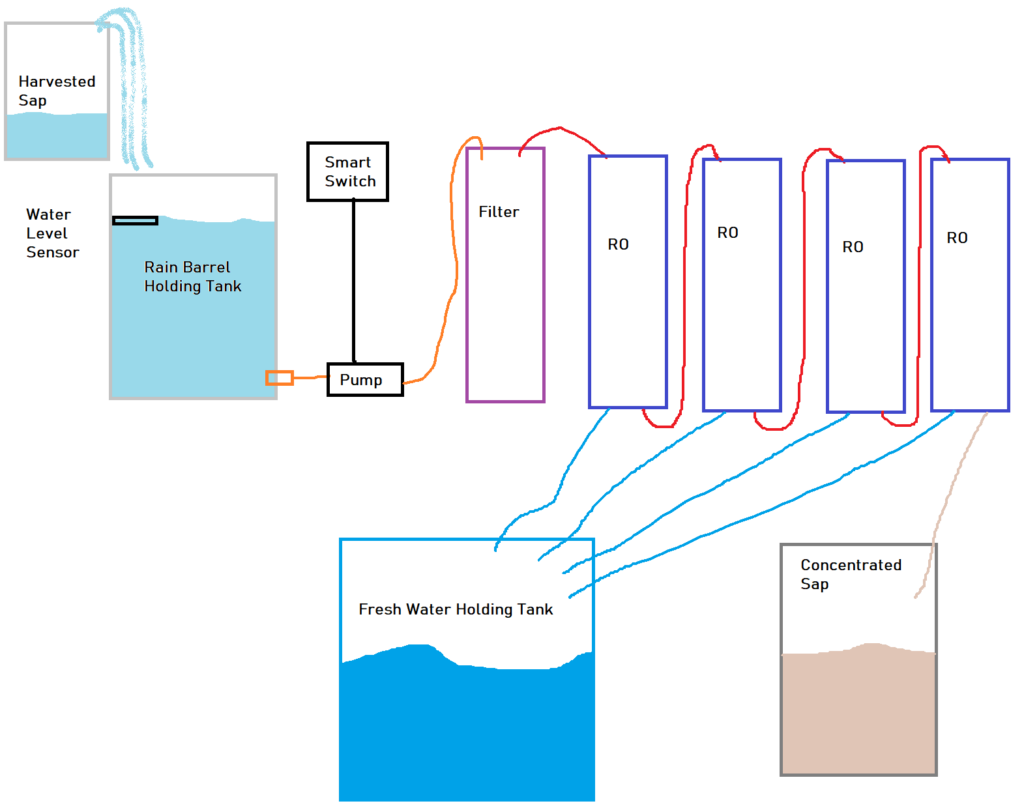
Multiple RO membranes connected in series (“dirty” out goes to next one’s “in”, “clean” out goes to fresh water collection). 3x or 4x membrane — more concentrated as fluid runs through each of the membranes. Diminishing returns, 3-4 max units.

Process:
Sap goes into rain barrel — need valve out from rain barrel. Sensor in sap holding tank and smart outlet for pump — turn off pump when tank is near empty.

Pumped from rain barrel holding tank to filter. Output from filter to input on first RO.
“Fresh water” output from each RO goes to fresh water holding tank (rain barrel). “Dirty stuff” output from each RO goes to input on next RO for farther concentration.

“Dirty stuff” output from final RO, the concentrated sap, goes into Digiboil (65L, ~17 gallons of liquid)

Little pump we use for brewing draws from Digiboil to fill boil trays on the burners.

RO system:
Pump — need to compare this one and this $40 one.
Water filter housing Either with 1/4″ inputs or 3/8″ inputs  — prefer 3/8″
Water filter 10″ long x 2.5″ across filters — these look like they’d fit
RO membrane & housing combo but we can get replacement things from Ali for about $10


Connections:
Something from rain barrel to 3/8″ input on pump — GHT female and 3/8″ male
Something from 3/8″ output on pump to 3/8″ input on filter
Something from 3/8″ output on filter to 1/4″ input on RO
3/8″ tubing from rain barrel to pump, from pump to filter, and from filter to RO
1/4″ tubing to run between RO filters
1/4″ tubing from each RO to fresh water holding tank
1/4″ tubing from last RO to Digiboil


Continuous Bias Tape

For Anya’s new book bag, I need piping — which is basically paracord wrapped in bias tape. My last few projects, making the bias tape has been an all day endeavor. ALL.DAY.LONG. Lining up, sewing, pressing, lining up, making sure I have the seams facing the right way, sewing, pressing …

I had seen people talk about one-cut methods for making loads of bias tape, so I decided to research alternate techniques. This is SO easy, I feel a little silly about the amount of time I put into quilt bindings and piping.

You start with a square of fabric — how much fabric? That depends! How much bias tape do you want? The number of square inches of bias tape is almost the number of square inches of the square with which you start — you’ve got to subtract out the square inches lost to the seam allowance. The seam is sewn along the sides of the square, and there is 2x the seam allowance per seam. Which means we’re subtracting 4x (two seams!) the length of the square’s side times the width of the seam allowance. Subtract that from the square inches of the original square and you’ve got the remaining square inches. To find the length of the tape, divide by the width of the tape. You could reverse the equation so an input desired length of tape produces a measurement for your square. Or make a quick spreadsheet and try different square sizes until you get close. Now the fabric will stretch, and your measurements won’t be perfect … but you should be close to the calculated length.

Now how do you make it? Start with a square, bisect it so you have two right triangles. Place the triangles so the right angles are on opposite sides — the 45 degree angle on one should be nested in the 90 degree angle of the other. Sew along the bottom edge — where the pins are below. Now you’ve got a parallelogram.

Draw lines the width you want your bias tape to be. I drew on both the front and back of the fabric so i was easy to line up. Pull the long corners of the parallelogram past the center — they’ll overlap a bit. You want each set of lines on one side to match up to the next line on the other side. But not meet up at the edge — you want them to meet up at your seam allowance. This is a little tricky, and it took me a time or two pinning and checking before the met at the right spot. Make sure both of your seams are on the same side of the tube. Stitch the two sides together. Cut along the line.

And you’ve got a long strip of bias tape. Fold it! To make piping, I folded it in half around paracord (yes, I’m sure cotton piping is cheaper, but I’ve got lots of paracord already, and it works).

Deodorant Recipe

There are two deodorant recipes I’ve found to be effective — the one without coconut oil is harder and stores better in the summer.

7 T shea butter
5 T arrowroot powder
3 T baking soda

OR

4 T shea butter
3 T coconut oil
5 T arrowroot powder
3 T baking soda

In the bowl of a double-boiler, melt the oil. In another bowl, mix the arrowroot powder and baking soda. Slowly pour powders into melted oil and stir to combine. Remove from heat and stir as it cools. When the mixture starts to thicken, scoop into container and allow to finish cooling.

Homemade Lip Balm

I’ve been making homemade soap for almost four years now, but haven’t ventured into the other personal products that can be made at home. Anya’s lips have been getting chapped this winter, and she picks at them … so they get rather ripped up. I had a tube of lip balm that I let her use. She’s four years old, and misused lip balm in all the ways one could imagine to misuse lip balm; and I took it from her. She proceeded to crawl up on the counter when I wasn’t looking and take it back. So when I found her writing on the cabinetry with the lip balm, I took it and hid it from her. Unfortunately, the next time we needed to use it … I have no idea where I hid it. We spent about half an hour looking, and still no lip balm. Good hiding spot, but her lips were getting really raw. So I decided to research lip balm recipes.

Now we have lip balm that doesn’t contain any funky ingredients. I’ve got quite a few oils for making soap, so the project didn’t require a lot of new ‘stuff’ either. Bonus!

Lip Balm Recipe:

25 grams of yellow beeswax
20 grams of shea butter
20 grams of cocoa butter
40 grams of coconut oil

All of these were put into a metal bowl. I put a couple of inches of water in a small saucepan and set the metal bowl into the saucepan. Turned the burner to ‘4’ and heated it for a LONG time until all of the wax melted. Next time, I’ll grate the wax 🙂 The big chunks took a while to melt down. The grated slivers melted before the cocoa butter.

Once everything has melted, add any essential oils you may want (I used about half a teaspoon of peppermint oil, but the peppermint is really subtle). Then pour into containers — if you are using tubes, make sure they are twisted all the way down first! Let them sit for twenty minutes or so to cool. Voila, lip balm!