Tag: gitlab

GitLab – Using the Docker Executor for Testing

Setting up gitlab-runner to use a Docker executor: You need Docker running on the gitlab-runner host. In my sandbox, I have GitLab running as a Docker container. Instead of installing Docker in Docker, I have mounted the host Docker socket to the GitLab container. You’ll need to add the –privileged flag, and since I’m using Windows … my mount path is funky. But it works.

docker run –detach –hostname gitlab.rushworth.us –publish 443:443 –publish 80:80 –publish 22:22 –name gitlab -v //var/run/docker.sock:/var/run/docker.sock –privileged gitlab/gitlab-ee:latest

Register the runner using “docker-runner register”. I always specify the image in my CI YAML file, so the default image is immaterial … but I’ve encountered groups with an image that mirrors the production servers who set that image as the default.

Edit /etc/gitlab-runner/config.toml and change “privileged = false” to true.

Start the runner (docker-runner start). In the GitLab Admin Area, navigate to Overview => Runners and select the one we just created. When a project is updated, tags can be used to select an appropriate runner. Because most of my testing is done with the shell executor, the runner which uses the shell executor has no tags and the runner which uses the Docker executor is tagged with “runner-docker”. You can require all jobs include a tag to select the appropriate runner (which avoids someone accidentally forgetting a tag and having their project processed through the wrong runner).

An image – you’ll need an image. You can use base images from the Docker Hub registry or create your own image. You can add components in the before_script or use a Dockerfile to build an image from the parent image.

Now we’re ready to use the Docker executor! Create your CI YAML file.

If you are not using the default image, start with “image: <the image you want>”.

We don’t want phpunit in the running image, but I use it for testing. Thus, I need a before_script component to install the phpunit package.

If you’ve used a tag to restrict what is run in your Docker-executor based runner, add the appropriate tag. Include the tester command line.

.gitlab.yml:

image: gitlab.rushworth.us:4567/lisa/ljtestproject-dockerexecutor
stages:
- test

before_script:
# Install dependencies
- bash ci/docker_InstallReqs.sh

test_job:
stage: test
tags:
- runner-docker
script:
- phpunit --configuration phpunit_myapp.xml

Docker_InstallReqs.sh

#!/bin/bash
yum install php-phpunit-PHPUnit

Now when you commit changes to the repository, the Docker-executor based runner will be used for the CI/CD pipeline. A transient Docker container will be created with the image, your before_script will be executed, and then the test script will be run within the container.


GitLab – Using the built-in Docker Registry

GitLab has a built-in Docker registry that you can use for projects. With the Omnibus install (or a container based on the official Docker image), enabling the registry is as simple as adding a config line to your gitlab.rb (this assumes you have a SSL key at /etc/gitlab/ssl named with the fully qualified hostname and using .crt for the public key and .key for the private key

registry_external_url ‘https://gitlab.example.com:4567’

Then just tag an image to a project’s repository URL

docker tag ossautomation/cent68php56 gitlab.example.com:4567/lisa/ljtestproject-dockerexecutor

Log in and push the image:

D:\git\ljtestproject-dockerexecutor>docker login gitlab.example.com:4567
Username: lisa
Password:
Login Succeeded

D:\git\ljtestproject-dockerexecutor>docker push gitlab.example.com:4567/lisa/ljtestproject-dockerexecutor
The push refers to repository [gitlab.example.com:4567/lisa/ljtestproject-dockerexecutor]
45c3e2f5d139: Pushing [=> ] 33.31MB/1.619GB

GitLab SSH Deployment Setup

Preliminary stuff – before setting up SSH deployment in your pipeline, you’ll need a user on the target box with permission to write to the files being published. You will need a public/private key pair.

On the target server, the project needs to be cloned into the deployment directory. The public key will need to be added to authorized_keys (or authorized_keys2 on older versions of Linux) file so the private key can be used for authentication.

To set up your GitLab project for SSH-based deployment, you need to add some variables to the project. In the project, navigate to Settings ==> CI/CD

Expand the “Variables” section. You will need to add the following key/value variable pairs:

Key Value
SSH_KNOWN_HOSTS Output of ssh-keyscan targetserver.example.com
SSH_PRIVATE_KEY Content of your private key
DEPLOYMENT_HOST Target hostname, e.g. targetserver.example.com
DEPLOYMENT_USER Username on target server
DEPLOYMENT_PATH Path to which project will be deployed on target server

Save the variables

I am managing both a production and development deployment within the pipeline, so I’ve got prod and dev specific variables. We use the same username for prod and dev; but the hostname, path, and target server public key are different.

If your repository is publicly readable, this is sufficient. If you have a private repository, you’ll need a way to authenticate and fetch the data. In this example, I am using a deployment token. Under Settings Repository, expand the “Deployment Tokens” section and create a deployment token. On my target servers, the remote is added as https://TokenUser:TokenSecret@gitlab.example.com/path/to/project.git instead of just https://gitlab.example.com/path/to/project.git

Once you have defined these variables within the project, use the variables in your CI/CD YAML. In this example, I am deploying PHP code to a web server. Changes to the development branch are deployed to the dev server, and changes to the master branch are deployed to the production server.

In the before_script, I set up the key-based authentication by adding the private key to my runner environment and adding the prod and dev target server’s public key to the runner environment.

- 'which ssh-agent || ( apt-get update -y && apt-get install openssh-client -y )'
- eval $(ssh-agent -s)
- echo "$SSH_PRIVATE_KEY" | tr -d '\r' | ssh-add - > /dev/null
- mkdir -p ~/.ssh
- chmod 700 ~/.ssh
- echo "$SSH_KNOWN_HOSTS_DEV" > ~/.ssh/known_hosts
- echo "$SSH_KNOWN_HOSTS_PROD" >> ~/.ssh/known_hosts
- chmod 644 ~/.ssh/known_hosts

In the deployment component, username and host variables are used to connect to the target server via SSH. The commands run over that SSH session change directory into the deployment target path and use “git pull” to fetch and merge the updated code. This ensures the proper branch is pulled to the production and down-level environments.

production-deployment:
 stage: deploy
  script:
    - ssh $DEPLOYMENT_USER@$DEPLOYMENT_HOST_PROD "cd '$DEPLOYMENT_PATH_PROD'; git pull origin master"
  only:
    - master

development-deployment:
 stage: deploy
 script:
   - ssh $DEPLOYMENT_USER@$DEPLOYMENT_HOST_DEV "cd '$DEPLOYMENT_PATH_DEV'; git pull origin development"
 only:
   - development

Now when I make changes to the project code,

Assuming the tests still pass, the deployment will run

If you click on the deployment component, you can see what changes were pulled to the target server

And, yes, the updated files are on my target server.


Setting up gitlab-runner

CLI on the GitLab server:

# Set up the GitLab Repo
curl -L https://packages.gitlab.com/install/repositories/runner/gitlab-runner/script.rpm.sh

# Install package
yum install gitlab-runner

# verify runner is executable
ll `which gitlab-runner`
# If needed, flag it executable – shouldn’t be a problem with RPM installations, but it’s been a problem for me with manual installs
#chmod ugo+x /usr/local/bin/gitlab-runner

# Register a runner
gitlab-runner register

# use URL & token from http://<GITLABSERVER>/admin/runners
# add tags, if you want to use tags to assign runner
# executor: shell (and docker, if you want to use docker executors. The shell executor is the simplest case, so I am starting there)

# start the runner
gitlab-runner start

On the GitLab Web GUI:

Admin section => Overview => Runners. Click pencil to edit the runner and uncheck “Lock to current projects”, and (unless you want to use tagging) check “Run untagged jobs”

** I was getting an error in every pipeline job saying the git command was not found.

For most other commands, you can append to the path in the before_script section of your .gitlab-ci.yml

before_script:
– export PATH=$PATH:/opt/whatever/odd/path/bin

But that doesn’t work in this case because we’re not getting that far: the bootstrap “stuff” cannot fetch the project to see the before script. Git, on my system, was part of the GitLab package. I just created a symlink into a “normal” binary location:

root@gitlab:~# which git
/opt/gitlab/embedded/bin/git
root@gitlab:~# ln -s /opt/gitlab/embedded/bin/git /usr/bin/git

And we’ve got successful test execution:


Did you know … you can push GitLab notifications to Microsoft Teams?

Microsoft Teams offers a lot of connectors which allow you to see external notifications right in a Teams channel, and you can push GitLab notifications to Teams. Determine the channel into which you want the notifications posted – I decided to make a new channel just for GitLab notifications, but you can use an existing channel too. Click the hamburger menu next to the channel name and select “Connectors”

Locate “Incoming Webhook” and click “Add” next to it

There’s not much to see here – just click “Install”

Provide a descriptive name for the webhook and click “Create”

Scroll down and copy the webhook URL

Click “Done”. Now go to your GitLab project. On the sidebar, scroll down to “Settings” and select “Integrations”

Scroll down to the “Project services” section.

Locate “Microsoft Teams Notification” and click on it

Check the box to activate the integration. Select the events for which you want information pushed to Teams

Remember that URL we copied? Well, here’s where you paste it in. You can elect to receive notifications for only the default branch or all branches. You can elect to receive all pipeline notifications or only broken pipeline notifications. Click “Test settings and save changes”

If everything worked, you will see a banner indicating that the Microsoft Teams Notification was activated.

Now do something in your GitLab project – commit a code update, create an issue, add a page to the Wiki … anything that you’ve selected to trigger notifications.

And … check out your Teams channel:

Certificate Error On Git

Finally got around to switching my GitLab site over to HTTPS — made an ssl folder in /etc/gitlab and then placed the public/private key pair in that folder. Files named with the external URL hostname with a key and crt suffix (gitlab.rushworth.us.crt and gitlab.rushworth.us.key in my case). Then in gitlab.rb, I changed the external_url to an https:// prefix. Voila, a secure GitLab server.

Oops – forgot about the client. Adding the secure site as the remote, I get “unable to get local issuer certificate” on the git client. Since I used a CA signed certificate, I just had to put the CA public key into git’s ca bundle. If you use a self-signed certificate, I believe the certificate public key would need to be used.

Where is git’s CA bundle? Ask git:

C:\Program Files\Git\bin>git config –list
core.symlinks=false
core.autocrlf=true
core.fscache=true
color.diff=auto
color.status=auto
color.branch=auto
color.interactive=true
help.format=html
rebase.autosquash=true
http.sslcainfo=C:/Program Files/Git/mingw64/ssl/certs/ca-bundle.crt
diff.astextplain.textconv=astextplain
filter.lfs.clean=git-lfs clean — %f
filter.lfs.smudge=git-lfs smudge — %f
filter.lfs.required=true
filter.lfs.process=git-lfs filter-process
credential.helper=manager
http.sslverify=true

Edit that file with something that understands Unix new line characters and paste your CA public key at the end of the file.

Git Deployment

I ‘inherited’ the Git server at work — which means I had to learn how the back end component of Git works (beyond my file-system based implementation where there are just clients and a disk location). It is not as complicated as I feared. The chap who had deployed the Git backend at work chose Bonobo — since he no longer works for the company, I cannot just ask why this particular implementation. It’s Windows based and priced in our 0$ budget, and I am certain these were selling points. It seems quite stripped down compared to GitHub too — none of the issue tracking / Wiki / chat about it features. Which, for what my department does, is fine. We are not software developers. We have a lot of internal code for task automation, we have some internal code for departmental web sites, and we have some sample code we hand out to other developers (i.e. someone wants to start using LDAP or ADFS authentication, we can give them a sample implementation in their language). There aren’t feature requests. Generally speaking, there aren’t simultaneous development tasks on a project.

Since I deciphered the server implementation at work, I wanted to set up a Git server at home too. The limited feature set of Bonobo was off-putting. I wanted integrated issue tracking. Looking at the available opensource and free options, I selected GitLab. As a sandbox — poke around the server, see how it works and what features it offers — I wanted something ready-to-go. I noticed that there is a Docker container for the project. I helped a few friends who were testing Docker as a development and deployment methodology (I’ve even suggested it for my employer’s internal development staff … being able to develop and run an application with an integrated web server *without* needing the Windows permissions and configuration for a web server (and doing it all over again when your computer is replaced) seemed efficient. But I’d never actually used a Docker container before. It is incredibly easy.

Install docker — a bit obvious, but that was the most time consuming part of the process. I elected to install it on my Windows laptop for expediency. If we decide not to use GitLab, I haven’t thrown a bunch of unnecessary binaries on the server. Lenovo, as a default, does not enable virtualisation. Getting into the BIOS config tool (shift then click the power button, keep holding shift whilst you click restart) was the most time consuming bit of the installation.

Once Docker is installed, pull the container from the Docker store (docker pull gitlab/gitlab-ce). Then run it (docker run –detach –hostname gitlab.rushworth.us –publish 443:443 –publish 80:80 –publish 22:22 –name gitlab –restart always –volume /srv/gitlab/config://c/gldata/etc –volume /srv/gitlab/logs:/var/log/gitlab –volume /srv/gitlab/data://c/gldata/data –volume /svr/docker/gitlab/gitlab://c/gldata/gitlab gitlab/gitlab-ce:latest). You can remap ports (e.g. publish 8443:443) if needed.

Not quite there yet — you’ve got to edit the container config (docker exec -it gitlab vi /etc/gitlab/gitlab.rb) for your environment. Set a valid external url (external_url ‘http://gitlab.rushworth.us’). I also enabled LDAP authentication to test that out.


gitlab_rails[‘ldap_enabled’] = true

###! **remember to close this block with ‘EOS’ below**
gitlab_rails[‘ldap_servers’] = YAML.load <<-‘EOS’
main: # ‘main’ is the GitLab ‘provider ID’ of this LDAP server
label: ‘LDAP’
host: ‘ADHostname.rushworth.us’
port: 636
uid: ‘sAMAccountName’
method: ‘ssl’ # “tls” or “ssl” or “plain”
bind_dn: ‘cn=UserID,ou=SystemAccounts,dc=domain,dc=ccTLD’
password: ‘AccountPasswordGoesHere’
active_directory: true
allow_username_or_email_login: false
block_auto_created_users: false
base: ‘ou=ResourceUsers,dc=domain,dc=ccTLD’
user_filter: ‘(&(sAMAccountName=*))’ # Can add attribute value to restrict authorized users to GitLab access, we leave open to all valid user accounts in the OU. Should be able to authorize based on group membership using linked attribute value like (&(memberOf=cn=group,ou=groupOU,dc=domain,dc=ccTLD))
attributes:
username: [‘uid’, ‘userid’, ‘sAMAccountName’]
email: [‘mail’, ’email’, ‘userPrincipalName’]
name: ‘cn’
first_name: ‘givenName’
last_name: ‘sn’

EOS


The default is to retain a lot of log files — 30 days! This might be reasonable in a corporate environment, but even for production at home … that’s a lot of space dedicated to log files.


logging[‘logrotate_frequency’] = “daily” # rotate logs daily
logging[‘logrotate_rotate’] = 3 # keep 3 rotated logs
logging[‘logrotate_compress’] = “compress” # see ‘man logrotate’
logging[‘logrotate_method’] = “copytruncate” # see ‘man logrotate’


And finally configure SMTP for outbound mail. We don’t use authentication on our SMTP server; it controls relay based on source IP. We do use starttls, but the certificate is not going to be trusted without additional configuration … so I set the ssl verify mode to none.


gitlab_rails[‘smtp_enable’] = true
gitlab_rails[‘smtp_address’] = “smtp.hostname.ccTLD”
gitlab_rails[‘smtp_port’] = 25
# gitlab_rails[‘smtp_user_name’] = “smtp user”
# gitlab_rails[‘smtp_password’] = “smtp password”
# gitlab_rails[‘smtp_domain’] = “example.com”
# gitlab_rails[‘smtp_authentication’] = “login”
gitlab_rails[‘smtp_enable_starttls_auto’] = true
# gitlab_rails[‘smtp_tls’] = false

###! **Can be: ‘none’, ‘peer’, ‘client_once’, ‘fail_if_no_peer_cert’**
###! Docs: http://api.rubyonrails.org/classes/ActionMailer/Base.html
gitlab_rails[‘smtp_openssl_verify_mode’] = ‘none’


Once the config has been updated, restart the container (docker restart gitlab).

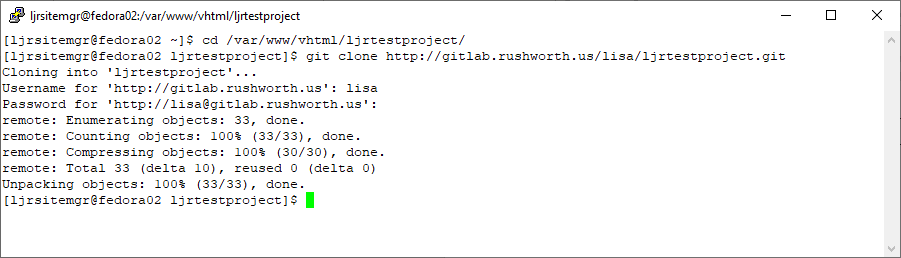
Access the web site and you’ll be prompted to set a password for the admin user, root. You can click the ‘ldap’ tab and log in with Active Directory credentials. Fin.

If we deploy this for a production system, I would set up SSL on the web site and possibly externalize the GitLab database to MySQL. The external database is more of an academic experiment because we already use MySQL (and I still don’t want  to learn about vacuuming PostgreSQL).